React 全家桶(技术栈)
01. React 入门
1.1 React 简介
1.1.1 官网
1.1.2 介绍描述
- 用于动态构建用户界面的 JavaScript 库(只关注于视图)
- 由 Facebook 开源
1.1.3 React 的特点
- 声明式编码
- 组件化编码
- React Native 编写原生应用
- 高效(优秀的 Diffing 算法)
1.1.4 React 高效的原因
- 使用虚拟(virtual)DOM, 不总是直接操作页面真实 DOM。
- DOM Diffing 算法, 最小化页面重绘。
1.2 React 的基本使用
1.2.1 效果
html
<div>
  <h1>Hello,React</h1>
</div>1.2.2 相关 js 库
- react.js:React 核心库。
- react-dom.js:提供操作 DOM 的 react 扩展库。
- babel.min.js:解析 JSX 语法代码转为 JS 代码的库。
1.2.3 创建虚拟 DOM 的两种方式
- 纯 JS 方式(一般不用)
- JSX 方式
1.2.4 虚拟 DOM 与真实 DOM
- React 提供了一些 API 来创建一种 “特别” 的一般 js 对象
- const VDOM = React.createElement('xx',{id:'xx'},'xx')
- 上面创建的就是一个简单的虚拟 DOM 对象
- 虚拟 DOM 对象最终都会被 React 转换为真实的 DOM
- 我们编码时基本只需要操作 react 的虚拟 DOM 相关数据, react 会转换为真实 DOM 变化而更新界面。
1.3 React JSX
1.3.1 效果
html
<div>
  <h1>Hello,jsx</h1>
</div>1.3.2 JSX
- 全称: JavaScript XML
- react 定义的一种类似于 XML 的 JS 扩展语法: JS + XML 本质是 React.createElement(component, props, ...children)方法的语法糖
- 作用: 用来简化创建虚拟 DOM
- 写法:
var ele = <h1>Hello JSX!</h1> - 注意 1:它不是字符串, 也不是 HTML/XML 标签
- 注意 2:它最终产生的就是一个 JS 对象
- 写法:
- 标签名任意: HTML 标签或其它标签
- 标签属性任意: HTML 标签属性或其它
- 基本语法规则
- 遇到 <开头的代码, 以标签的语法解析: html 同名标签转换为 html 同名元素, 其它标签需要特别解析
- 遇到以 { 开头的代码,以 JS 语法解析: 标签中的 js 表达式必须用{ }包含
- babel.js 的作用
- 浏览器不能直接解析 JSX 代码, 需要 babel 转译为纯 JS 的代码才能运行
- 只要用了 JSX,都要加上 type="text/babel", 声明需要 babel 来处理
1.3.3 渲染虚拟 DOM(元素)
- 语法: ReactDOM.render(virtualDOM, containerDOM)
- 作用: 将虚拟 DOM 元素渲染到页面中的真实容器 DOM 中显示
- 参数说明
- 参数一: 纯 js 或 jsx 创建的虚拟 dom 对象
- 参数二: 用来包含虚拟 DOM 元素的真实 dom 元素对象(一般是一个 div)
1.3.4 JSX 练习
- 需求: 动态展示列表
html
<!DOCTYPE html>
<html lang="en">
  <head>
    <meta charset="UTF-8" />
    <meta http-equiv="X-UA-Compatible" content="IE=edge" />
    <meta name="viewport" content="width=device-width, initial-scale=1.0" />
    <title>hello_react</title>
    <!-- 用于将jsx转化为js -->
    <script src="../js/babel.min.js"></script>
    <!-- 引入react核心库 -->
    <script src="../js/react.development.js"></script>
    <!-- 用于支持dom操作 -->
    <script src="../js/react-dom.development.js"></script>
  </head>
  <body>
    <!-- 准备容器 -->
    <div id="list"></div>

    <script type="text/babel">
      /* 此处一定要写babel */
      // 1.创建虚拟dom
      const VDOM = (
        <ul>
          <li>Vue</li>
          <li>React</li>
          <li>Angular</li>
        </ul>
      );
      // 2.渲染虚拟dom到页面
      ReactDOM.render(VDOM, document.getElementById("list"));
    </script>
  </body>
</html>1.4 模块与组件、模块化与组件化的理解
1.4.1 模块
- 理解:向外提供特定功能的 js 程序, 一般就是一个 js 文件
- 为什么要拆成模块:随着业务逻辑增加,代码越来越多且复杂。
- 作用:复用 js, 简化 js 的编写, 提高 js 运行效率
1.4.2 组件
- 理解:用来实现局部功能效果的代码和资源的集合(html/css/js/image 等等)
- 为什么要用组件: 一个界面的功能更复杂
- 作用:复用编码, 简化项目编码, 提高运行效率
1.4.3 模块化
- 当应用的 js 都以模块来编写的, 这个应用就是一个模块化的应用
1.4.4 组件化
- 当应用是以多组件的方式实现, 这个应用就是一个组件化的应用
02. 基本理解和使用
2.1 基本理解和使用
2.1.1 使用 React 开发者工具调试
- 在浏览器中导入
react_dev_tools插件
2.1.2 效果
函数式组件:
js
// 1.创建函数式组件
function MyComponent() {
  console.log(this); // 此处的this是undefined,因为babel编译后开启了严格模式use strict
  return <h2>我是用函数定义的组件(适用于【简单组件】的定义)</h2>;
}
// 2.渲染组件到页面
ReactDOM.render(<MyComponent />, document.getElementById("test"));
/*
  执行了渲染函数之后,发生了:
  1.React会解析组件标签,找到MyComponent组件。
  2.发现组件是由函数定义的,随后调用函数,将返回的虚拟DOM转为真实DOM并渲染。
*/类式组件:
js
// 1.创建类式组件
class MyComponent extends React.Component {
  render() {
    // render是放在MyComponent的原型上,供实例使用。
    // render中的this,是MyComponents的实例对象
    console.log(this);
    console.log(this instanceof MyComponent);
    return <h2>我是用类定义的组件(适用于【复杂组件】的定义)</h2>;
  }
}
// 2.渲染组件到页面
ReactDOM.render(<MyComponent />, document.getElementById("test"));
/*
  执行了渲染函数之后,发生了:
  1.React会解析组件标签,找到MyComponent组件。
  2.发现组件是由类定义的,随后new出来MyComponent类的实例,并通过该实例调用到原型上的render方法。
  3.将render返回的虚拟DOM转化为真实DOM并渲染。
*/2.1.3 注意
- 组件名必须首字母大写
- 虚拟 DOM 元素只能有一个根元素
- 虚拟 DOM 元素必须有结束标签
2.1.4 渲染类组件标签的基本流程
- React 内部会创建组件实例对象
- 调用 render()得到虚拟 DOM, 并解析为真实 DOM
- 插入到指定的页面元素内部
2.2 属性 1: state
2.2.1 效果
需求: 定义一个展示天气信息的组件
- 默认展示天气炎热 或 凉爽
- 点击文字切换天气
2.2.2 理解
- state 是组件对象最重要的属性, 值是对象(可以包含多个 key-value 的组合)
- 组件被称为"状态机", 通过更新组件的 state 来更新对应的页面显示(重新渲染组件)
2.2.3 强烈注意
- 组件中 render 方法中的 this 为组件实例对象
- 组件自定义的方法中 this 为 undefined,如何解决?
- 强制绑定 this: 通过函数对象的 bind()
- 箭头函数
- 状态数据,不能直接修改或更新,需要使用 setState 函数
- state 的简写方式:
js
// 1.创建类式组件
class Weather extends React.Component {
  // 初始化状态
  state = {
    isHot: true,
  };
  render() {
    const { isHot } = this.state;
    return (
      <div>
        <h2 onClick={this.changeWeather}>
          今天天气很{isHot ? "炎热" : "凉爽"}
        </h2>
      </div>
    );
  }
  // 自定义方法,要用赋值语句+箭头函数的写法
  changeWeather = () => {
    const { isHot } = this.state;
    this.setState({
      isHot: !isHot,
    });
  };
}

// 2.渲染组件到页面
ReactDOM.render(<Weather />, document.getElementById("test"));2.3 属性 2: props
2.3.1 效果
需求: 自定义用来显示一个人员信息的组件
- 姓名必须指定,且为字符串类型;
- 性别为字符串类型,如果性别没有指定,默认为男
- 年龄为字符串类型,且为数字类型,默认值为 18
js
class Person extends React.Component {
  render() {
    const { name, age, gender } = this.props;
    return (
      <ul>
        <li>姓名:{name}</li>
        <li>性别:{gender}</li>
        <li>年龄:{age + 1}</li>
      </ul>
    );
  }
}
ReactDOM.render(
  <Person name="jerry" age={18} gender="男" />,
  document.getElementById("test1")
);
ReactDOM.render(
  <Person name="tom" age={16} gender="女" />,
  document.getElementById("test2")
);
const p = { name: "cat", age: 18, gender: "男" };
// console.log('@', ...p)
ReactDOM.render(<Person {...p} />, document.getElementById("test3"));2.3.2 理解
- 每个组件对象都会有 props(properties 的简写)属性
- 组件标签的所有属性都保存在 props 中
2.3.3 作用
- 通过标签属性从组件外向组件内传递变化的数据
- 注意: 组件内部不要修改 props 数据
2.3.4 编码操作
- 内部读取某个属性值
js
this.props.xxx;- 对 props 中的属性值进行类型限制和必要性限制 第一种方式(React v15.5 开始已弃用):
js
Person.propTypes = {
  name: React.PropTypes.string.isRequired, // 限制name为必传、字符串
  gender: React.PropTypes.string, // 限制gender为字符串
  age: React.PropTypes.number, // 限制age为数字
};第二种方式(新):使用 prop-types 库进限制(需要引入 prop-types 库)
js
Person.propTypes = {
  name: PropTypes.string.isRequired, // 限制name为必传、字符串
  gender: PropTypes.string, // 限制gender为字符串
  age: PropTypes.number, // 限制age为数字
};- 扩展属性: 将对象的所有属性通过 props 传递
js
<Person {...args} />- 默认属性值:
js
Person.defaultProps = {
  gender: "未知", // sex默认值
  age: 18, // age默认值
};- 组件类的构造函数
js
constructor(props) {
  // 构造器是否接收props,是否传递给super取决于是否希望在构造器中,通过this访问props
  super(props)
  // 如果上方不传props,则this.props为undefined
  console.log(this.props)
}- props 的简写方式:
js
class Person extends React.Component {
  // 对标签属性进行类型、必要性限制
  static propTypes = {
    name: PropTypes.string.isRequired, // 限制name为必传、字符串
    gender: PropTypes.string, // 限制gender为字符串
    age: PropTypes.number, // 限制age为数字
    speak: PropTypes.func, // 限制speak为函数
  };
  // 置顶标签属性默认值
  static defaultProps = {
    gender: "未知", // sex默认值
    age: 18, // age默认值
    city: "天津",
  };
  constructor(props) {
    // 构造器是否接收props,是否传递给super取决于是否希望在构造器中,通过this访问props
    super(props);
    console.log(this.props);
  }
  render() {
    console.log(this);
    const { name, age, gender } = this.props;
    // this.props.name = '123' // props是只读的
    return (
      <ul>
        <li>姓名:{name}</li>
        <li>性别:{gender}</li>
        <li>年龄:{age + 1}</li>
      </ul>
    );
  }
}

ReactDOM.render(
  <Person name="Jack" age={19} />,
  document.getElementById("test1")
);2.4 属性 3: refs 与事件处理
2.4.1 效果
需求: 自定义组件, 功能说明如下:
- 点击按钮, 提示第一个输入框中的值
- 当第 2 个输入框失去焦点时, 提示这个输入框中的值
- 代码如下:
js
class Demo extends React.Component {
  render() {
    return (
      <div>
        <input ref="input1" type="text" placeholder="点击按钮提示" />
        <button onClick={this.handleClick}>点击提示左侧数据</button>
        <hr />
        <input
          ref="input2"
          type="text"
          placeholder="失去焦点提示"
          onBlur={this.handleBlur}
        />
      </div>
    );
  }
  // 点击按钮提示
  handleClick = () => {
    const { input1 } = this.refs;
    alert(input1.value);
  };
  // input失去焦点
  handleBlur = () => {
    const { input2 } = this.refs;
    alert(input2.value);
  };
}
ReactDOM.render(<Demo />, document.getElementById("test1"));2.4.2 理解
- 组件内的标签可以定义 ref 属性来标识自己
2.4.3 编码
- 字符串形式的 ref【尽量不要使用,会有效率问题】
html
<input ref="input1" />- 回调形式的 ref【以内联函数定义时,组件更新会被执行两次】
jsx
<input ref={(c) => (this.input1 = c)} />- createRef 创建 ref 容器
jsx
myRef = React.createRef()
<input ref={this.myRef} />2.4.4 事件处理
- 通过 onXxx 属性指定事件处理函数(注意大小写)
- React 使用的是自定义(合成)事件, 而不是使用的原生 DOM 事件
- React 中的事件是通过事件委托方式处理的(委托给组件最外层的元素)
- 通过 event.target 得到发生事件的 DOM 元素对象
2.5 收集表单数据
2.5.1 效果
需求:
- 定义一个包含表单的组件
- 输入用户名密码后, 点击登录提示输入信息
2.5.2 理解
包含表单的组件分类:
- 受控组件
js
class Login extends React.Component {
  state = {
    username: "",
    password: "",
  };
  render() {
    return (
      <form onSubmit={this.handleLogin}>
        账号:
        <input onChange={this.usernameChange} type="text" name="username" />
        <br />
        密码:
        <input onChange={this.passwordChange} type="password" name="password" />
        <br />
        <button>登录</button>
      </form>
    );
  }
  usernameChange = (e) => {
    this.setState({
      username: e.target.value,
    });
  };
  passwordChange = (e) => {
    this.setState({
      password: e.target.value,
    });
  };
  handleLogin = (e) => {
    e.preventDefault();
    const { username, password } = this.state;
    alert(`账号:${username}, 密码:${password}`);
  };
}
ReactDOM.render(<Login />, document.getElementById("test1"));- 非受控组件
js
class Login extends React.Component {
  myInput1 = React.createRef();
  myInput2 = React.createRef();
  render() {
    return (
      <form onSubmit={this.handleLogin}>
        账号:
        <input ref={(c) => (this.username = c)} type="text" name="username" />
        <br />
        密码:
        <input
          ref={(c) => (this.password = c)}
          type="password"
          name="password"
        />
        <br />
        <button>登录</button>
      </form>
    );
  }
  handleLogin = (e) => {
    e.preventDefault();
    const { username, password } = this;
    alert(`账号:${username.value}, 密码:${password.value}`);
  };
}
ReactDOM.render(<Login />, document.getElementById("test1"));2.6 组件的生命周期
2.6.1 效果
需求:定义组件实现以下功能:
- 让指定的文本做显示 / 隐藏的渐变动画
- 从完全可见,到彻底消失,耗时 2S
- 点击按钮从界面中卸载组件
js
//创建组件
class Life extends React.Component {
  state = {
    opacity: 1,
  };
  // 组件挂载完毕
  componentDidMount() {
    this.timer = setInterval(() => {
      let { opacity } = this.state;
      this.setState({
        opacity: opacity <= 0 ? 1 : opacity - 0.1,
      });
    }, 200);
  }
  // 组件将要卸载
  componentWillUnmount() {
    clearInterval(this.timer);
  }
  // 初始化渲染、状态更新之后 1 + n
  render() {
    console.log("render");
    // 挂载
    return (
      <div>
        <h2 style={{ opacity: this.state.opacity }}>React学不会怎么办</h2>
        <button onClick={this.BtnClick}>点击</button>
      </div>
    );
  }
  BtnClick = () => {
    // 卸载
    ReactDOM.unmountComponentAtNode(document.getElementById("test"));
  };
}

// 渲染组件
ReactDOM.render(<Life />, document.getElementById("test"));2.6.2 理解
- 组件从创建到死亡它会经历一些特定的阶段。
- React 组件中包含一系列勾子函数(生命周期回调函数), 会在特定的时刻调用。
- 我们在定义组件时,会在特定的生命周期回调函数中,做特定的工作。
2.6.3 生命周期流程图(旧)
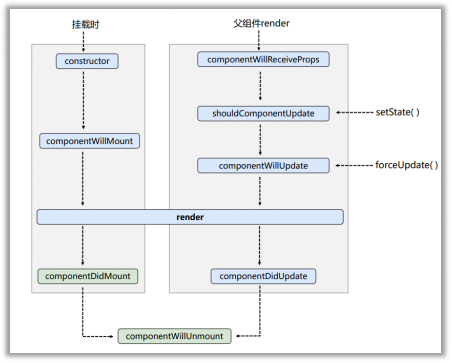
生命周期的三个阶段(旧)
- 初始化阶段: 由 ReactDOM.render()触发---初次渲染
- constructor()
- componentWillMount()
- render()
- componentDidMount()
- 更新阶段: 由组件内部 this.setSate()或父组件重新 render 触发
- shouldComponentUpdate()
- componentWillUpdate()
- render()
- componentDidUpdate()
- 卸载组件: 由 ReactDOM.unmountComponentAtNode()触发
- componentWillUnmount()
js
//创建组件
class Count extends React.Component {
  // 构造函数
  constructor(props) {
    console.log("Count---constructor");
    super(props);
    this.state = {
      count: 0,
    };
  }
  // 组件即将挂载
  componentWillMount() {
    console.log("Count---componentWillMount");
  }
  // 组件挂载完成
  componentDidMount() {
    console.log("Count---componentDidMount");
  }

  // 组件是否应该更新
  shouldComponentUpdate() {
    console.log("Count---shouldComponentUpdate");
    return true;
  }
  // 强制组件更新
  forceUpdateByReact = () => {
    this.forceUpdate();
  };
  // 组件即将更新
  componentWillUpdate() {
    console.log("Count---componentWillUpdate");
  }
  // 组件完成更新
  componentDidUpdate() {
    console.log("Count---componentDidUpdate");
  }

  // 组件即将卸载
  componentWillUnmount() {
    console.log("Count---componentWillUnmount");
  }
  // 渲染组件
  render() {
    console.log("Count---render");
    const { count } = this.state;
    return (
      <div>
        <h2>当前数字:{count}</h2>
        <button onClick={this.add}>点击</button>
        <br />
        <button onClick={this.forceUpdateByReact}>强制更新</button>
        <br />
        <button onClick={this.kill}>卸载组件</button>
      </div>
    );
  }
  add = () => {
    let { count } = this.state;
    this.setState({
      count: count + 1,
    });
  };
  kill = () => {
    ReactDOM.unmountComponentAtNode(document.getElementById("test"));
  };
}

class A extends React.Component {
  state = {
    carName: "奔驰",
  };
  render() {
    return (
      <div>
        <div>我是A组件</div>
        <button onClick={this.changeCar}>换车</button>
        <B carName={this.state.carName} />
      </div>
    );
  }
  changeCar = () => {
    this.setState({
      carName: "奥拓",
    });
  };
}

class B extends React.Component {
  // 组件即将接收Props
  componentWillReceiveProps(props) {
    console.log("B---componentWillReceiveProps", props);
  }
  // 组件是否应该更新
  shouldComponentUpdate() {
    console.log("B---shouldComponentUpdate");
    return true;
  }
  // 组件即将更新
  componentWillUpdate() {
    console.log("B---componentWillUpdate");
  }
  // 组件完成更新
  componentDidUpdate() {
    console.log("B---componentDidUpdate");
  }
  render() {
    console.log("B---render");
    return <div>我是B组件,车名:{this.props.carName}</div>;
  }
}

// 渲染组件
ReactDOM.render(<Count />, document.getElementById("test"));
// ReactDOM.render(<A />, document.getElementById('test'))2.6.4 生命周期流程图(新)
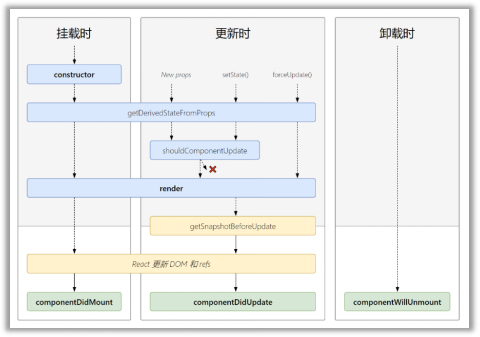
生命周期的三个阶段(新)
- 初始化阶段: 由 ReactDOM.render()触发---初次渲染
- constructor()
- getDerivedStateFromProps
- render()
- componentDidMount()
- 更新阶段: 由组件内部 this.setSate()或父组件重新 render 触发
- getDerivedStateFromProps
- shouldComponentUpdate()
- render()
- getSnapshotBeforeUpdate
- componentDidUpdate()
- 卸载组件: 由 ReactDOM.unmountComponentAtNode()触发
- componentWillUnmount()
js
//创建组件
class Count extends React.Component {
  // 构造函数
  constructor(props) {
    console.log("Count---constructor");
    super(props);
    this.state = {
      count: 0,
    };
  }

  // 通过传入的值获取派生的状态
  static getDerivedStateFromProps(props, state) {
    console.log("Count---getDerivedStateFromProps", props, state);
    return null;
  }

  // 在更新之前获取快照
  getSnapshotBeforeUpdate(prevProps, prevState) {
    console.log("getSnapshotBeforeUpdate", prevProps, prevState);
    return "atCat";
  }

  // 组件挂载完成
  componentDidMount() {
    console.log("Count---componentDidMount");
  }

  // 组件是否应该更新
  shouldComponentUpdate() {
    console.log("Count---shouldComponentUpdate");
    return true;
  }
  // 强制组件更新
  forceUpdateByReact = () => {
    this.forceUpdate();
  };
  // 组件完成更新
  componentDidUpdate(prevProps, prevState, snapshotValue) {
    console.log(
      "Count---componentDidUpdate",
      prevProps,
      prevState,
      snapshotValue
    );
  }

  // 组件即将卸载
  componentWillUnmount() {
    console.log("Count---componentWillUnmount");
  }
  // 渲染组件
  render() {
    console.log("Count---render");
    const { count } = this.state;
    return (
      <div>
        <h2>当前数字:{count}</h2>
        <button onClick={this.add}>点击</button>
        <br />
        <button onClick={this.forceUpdateByReact}>强制更新</button>
        <br />
        <button onClick={this.kill}>卸载组件</button>
      </div>
    );
  }
  add = () => {
    let { count } = this.state;
    this.setState({
      count: count + 1,
    });
  };
  kill = () => {
    ReactDOM.unmountComponentAtNode(document.getElementById("test"));
  };
}

// 渲染组件
ReactDOM.render(<Count count={199} />, document.getElementById("test"));2.6.5 重要的勾子
- render:初始化渲染或更新渲染调用
- componentDidMount:开启监听, 发送 ajax 请求
- componentWillUnmount:做一些收尾工作, 如: 清理定时器
2.6.6 即将废弃的勾子
- componentWillMount
- componentWillReceiveProps
- componentWillUpdate 现在使用会出现警告,下一个大版本需要加上 UNSAFE_前缀才能使用,以后可能会被彻底废弃,不建议使用。
03. React 应用(React 脚手架)
3.1 创建 react 应用
3.1.1 react 脚手架
- xxx 脚手架: 用来帮助程序员快速创建一个基于 xxx 库的模板项目
- 包含了所有需要的配置(语法检查、jsx 编译、devServer…)
- 下载好了所有相关的依赖
- 可以直接运行一个简单效果
- react 提供了一个用于创建 react 项目的脚手架库: create-react-app
- 项目的整体技术架构为: react + webpack + es6 + eslint
- 使用脚手架开发的项目的特点: 模块化, 组件化, 工程化
3.1.2 创建项目并启动
- 第一步,全局安装:npm i -g create-react-app
- 第二步,切换到想创项目的目录,使用命令:create-react-app hello-react
- 第三步,进入项目文件夹:cd hello-react
- 第四步,启动项目:npm start
3.1.3 react 脚手架项目结构
ls
public ---- 静态资源文件夹
  favicon.icon ------ 网站页签图标
  index.html -------- 主页面
  logo192.png ------- logo图
  logo512.png ------- logo图
  manifest.json ----- 应用加壳的配置文件
  robots.txt -------- 爬虫协议文件
src ---- 源码文件夹
  App.css -------- App组件的样式
  App.js --------- App组件
  App.test.js ---- 用于给App做测试
  index.css ------ 样式
  index.js ------- 入口文件
  logo.svg ------- logo图
  reportWebVitals.js --- 页面性能分析文件(需要web-vitals库的支持)
setupTests.js ---- 组件单元测试的文件(需要jest-dom库的支持)3.1.4 功能界面的组件化编码流程(通用)
- 拆分组件: 拆分界面,抽取组件
- 实现静态组件: 使用组件实现静态页面效果
- 实现动态组件:
- 3.1 动态显示初始化数据
- 3.1.1 数据类型
- 3.1.2 数据名称
- 3.1.2 保存在哪个组件?
- 3.2 交互(从绑定事件监听开始)
- 3.1 动态显示初始化数据
3.2 组件的组合使用-TodoList
功能: 组件化实现此功能
- 显示所有 todo 列表
- 输入文本, 点击按钮显示到列表的首位, 并清除输入的文本
- 父传子 props【字符串、布尔值、对象】
- 子传父 props【函数】
- uuid【安装:
yarn add nanoid】【使用:nanoid()】 - TodoList 案例
04. React ajax
4.1 理解
4.1.1 前置说明
- React 本身只关注于界面, 并不包含发送 ajax 请求的代码
- 前端应用需要通过 ajax 请求与后台进行交互(json 数据)
- react 应用中需要集成第三方 ajax 库(或自己封装)
4.1.2 常用的 ajax 请求库
- jQuery: 比较重, 如果需要另外引入不建议使用
- axios: 轻量级, 建议使用
- 封装 XmlHttpRequest 对象的 ajax
- promise 风格
- 可以用在浏览器端和 node 服务器端
4.2 react 脚手架配置代理
方法一
在 package.json 中追加如下配置
json
"proxy": "http://127.0.0.1:5000"说明:
- 优点:配置简单,前端请求资源时可以不加任何前缀。
- 缺点:不能配置多个代理。
- 工作方式:上述方式配置代理,当请求了 3000 不存在的资源时,那么该请求会转发给 5000 (优先匹配前端资源)
方法二
- 第一步:创建代理配置文件,在 src 下创建配置文件:
src/setupProxy.js - 编写 setupProxy.js 配置具体代理规则:
js
const proxy = require("http-proxy-middleware");
module.exports = function (app) {
  app.use(
    proxy.createProxyMiddleware("/api1", {
      //api1是需要转发的请求(所有带有/api1前缀的请求都会转发给5000)
      target: "http://127.0.0.1:5000", //配置转发目标地址(能返回数据的服务器地址)
      changeOrigin: true, //控制服务器接收到的请求头中host字段的值
      /*
      changeOrigin设置为true时,服务器收到的请求头中的host为:localhost:5000
      changeOrigin设置为false时,服务器收到的请求头中的host为:localhost:3000
      changeOrigin默认值为false,但我们一般将changeOrigin值设为true
      */
      pathRewrite: { "^/api1": "" }, //去除请求前缀,保证交给后台服务器的是正常请求地址(必须配置)
    }),
    proxy.createProxyMiddleware("/api2", {
      target: "http://127.0.0.1:5001",
      changeOrigin: true,
      pathRewrite: { "^/api2": "" },
    })
  );
};- 说明:
- 优点:可以配置多个代理,可以灵活的控制请求是否走代理。
- 缺点:配置繁琐,前端请求资源时必须加前缀。
- 注意:
- 低版本的 http-proxy-middleware 在配置代理时,不需要加
createProxyMiddleware,高版本必须加createProxyMiddleware
4.3 axios
4.3.1 文档
4.3.2 相关 API
- GET 请求
js
axios
  .get("/user?ID=12345")
  .then(function (response) {
    console.log(response.data);
  })
  .catch(function (error) {
    console.log(error);
  });

axios
  .get("/user", {
    params: {
      ID: 12345,
    },
  })
  .then(function (response) {
    console.log(response);
  })
  .catch(function (error) {
    console.log(error);
});- POST 请求
js
axios
  .post("/user", {
    firstName: "Fred",
    lastName: "Flintstone",
  })
  .then(function (response) {
    console.log(response);
  })
  .catch(function (error) {
    console.log(error);
});4.4 案例—github 用户搜索
4.5 消息订阅-发布机制
- 工具库: PubSubJS
- 下载: npm install pubsub-js --save
- 使用:
- import PubSub from 'pubsub-js' //引入
- const token = PubSub.subscribe('delete', function(_, data){ }); //订阅
- PubSub.publish('delete', data) //发布消息
- PubSub.unsubscribe(token) //移除
4.6 扩展:Fetch
4.6.1 文档
4.6.2 特点
- fetch: 原生函数,不再使用 XmlHttpRequest 对象提交 ajax 请求
- 老版本浏览器可能不支持
4.6.3 相关 API
- GET 请求
js
fetch(url)
  .then(function (response) {
    return response.json();
  })
  .then(function (data) {
    console.log(data);
  })
  .catch(function (e) {
    console.log(e);
});- POST 请求
js
fetch(url, {
  method: "POST",
  body: JSON.stringify(data),
})
  .then(function (data) {
    console.log(data);
  })
  .catch(function (e) {
    console.log(e);
});05. React 路由
5.1 相关理解
5.1.1 SPA 的理解
- 单页 Web 应用(single page web application,SPA)。
- 整个应用只有一个完整的页面。
- 点击页面中的链接不会刷新页面,只会做页面的局部更新。
- 数据都需要通过 ajax 请求获取, 并在前端异步展现。
5.1.2 路由的理解
- 什么是路由?
- 一个路由就是一个映射关系(key:value)
- key 为路径, value 可能是 function 或 component
- 路由分类
- 后端路由:
- 理解: value 是 function, 用来处理客户端提交的请求。
- 注册路由: router.get(path, function(req, res))
- 工作过程:当 node 接收到一个请求时, 根据请求路径找到匹配的路由, 调用路由中的函数来处理请求, 返回响应数据
- 前端路由:
- 浏览器端路由,value 是 component,用于展示页面内容。
- 注册路由:
<Route path="/test" component={Test}> - 工作过程:当浏览器的 path 变为/test 时, 当前路由组件就会变为 Test 组件
- 后端路由:
5.1.3 react-router-dom 的理解
- react 的一个插件库。
- 专门用来实现一个 SPA 应用。
- 基于 react 的项目基本都会用到此库。
5.2 react-router-dom 相关 API
5.2.1 内置组件
<BrowserRouter>history 模式的包裹<HashRouter>hash 模式的包裹<Route>注册路由组件<Redirect>重定向组件<Link>跳转组件<NavLink>跳转组件-高亮匹配<Switch>路由匹配到即停止
5.2.2 其它
- history 对象
- match 对象
- withRouter 函数
5.3 路由的使用
5.3.1 路由的基本使用
- 明确好界面中的组件构造
- 导航区的 a 标签改为
<Link to=""></Link>标签 - 内容区的展示组件改为
<Route path="" component={} />标签 - 在
<App />标签外包裹<BrowserRouter>或<HashRouter>
5.3.2 路由组件与一般组件的差异
- 写法不同:
- 一般组件
<Demo /> - 路由组件
<Route path="/demo" component={Demo} />
- 一般组件
- 存放位置不同:
- 一般组件:component
- 路由组件:pages
- 接收到的 props 不同
- 一般组件:父组件传递进来的数据
- 路由组件:接收路由传递的属性
jshistory: go: ƒ go(n) goBack: ƒ goBack() goForward: ƒ goForward() push: ƒ push(path, state) replace: ƒ replace(path, state) location: pathname: "/about" search: "" state: undefined match: isExact: true params: {} path: "/about" url: "/about"
5.3.3 NavLink 的使用
使用场景:当需要给路由添加高亮时
html
就可以把
<Link to="/about">About</Link>
替换为:
<NavLink to="/about">About</NavLink>- 当切换到对应的路由时,会给对应的 a 标签添加
active类 - 可通过修改
activeClassName,来修改高亮className - 示例:
html
<NavLink activeClassName="ecat" className="list-group-item" to="/about"
  >About</NavLink
>
简写:
<NavLink
  activeClassName="ecat"
  className="list-group-item"
  to="/about"
  children="About"
/>- 案例地址
可通过
this.props.children来获取组件标签体内容
5.3.4 Switch 使用
- 通常情况下,
Route的 path 和 component 是一一对应的关系。 Switch可以提高路由的匹配效率【匹配到即停止】。
html
<Switch>
  <Route path="/home" component="{Home}" />
  <Route path="/home" component="{Test}" />
  <Route path="/about" component="{About}" />
</Switch>5.3.5 样式缺失修复
- public 目录下的
index.html中引用文件使用绝对路径
html
<link rel="stylesheet" href="/css/bootstrap.css" />- public 目录下的
index.html中引用文件使用%PUBLIC_URL%
html
<link rel="stylesheet" href="%PUBLIC_URL%/css/bootstrap.css" />- 根
<App />组件使用<HashRouter>包裹
jsx
<HashRouter>
  <App />
</HashRouter>5.3.6 路由的严格匹配和模糊匹配
- 默认使用的是模糊匹配,【输入的路径】必须要包含【匹配的路径】,且顺序一致
- 开启严格模式
<Route exact path="" component={} /> - 严格模式不要随意开启,需要再打开,否则会导致无法匹配二级路由
5.3.7 Redirect 使用
- 一般写在所有路由注册的最下方,当所有路由都无法匹配时,跳转到 Redirect 指定的路由
- 示例:
jsx
<Switch>
  <Route path="/home" component={Home} />
  <Route path="/about" component={About} />
  <Redirect to="/home" />
</Switch>5.3.8 嵌套路由
- 注册子路由时要写上父路由的 path 值
- 路由的匹配是按照路由注册的顺序进行的
5.4 路由传参
5.4.1 params 传参
- 路由链接(携带参数)
jsx
<Link to=`/home/news/detail/${id}`>新闻1</Link>- 注册路由(接收参数)
jsx
<Route path="/home/news/detail/:id" component={Detail} />- 组件接参
jsx
const { id } = this.props.match.params;5.4.2 search 参数
- 路由链接(携带参数)
jsx
<Link to=`/home/news/detail/?id=${id}`>新闻1</Link>- 注册路由(无需接收参数)
jsx
<Route path="/home/news/detail" component={Detail} />- 组件接参
jsx
import qs from "querystringify";
// 获取到的search是一个urlencoded编码字符串,需要解析
const { id } = qs.parse(this.props.location.search);5.4.3 state 参数
- 路由链接(携带参数)
jsx
<Link to={{ pathname: "/home/news/detail", state: { id: item.id } }}>
  新闻1
</Link>- 注册路由(无需接收参数)
jsx
<Route path="/home/news/detail" component={Detail} />- 组件接参
jsx
const { id } = this.props.location.state;5.5 路由跳转模式
- push
jsx
<Link to={{ pathname: "/home/news/detail", state: { id: item.id } }}>
  新闻1
</Link>- replace
jsx
<Link replace to={{ pathname: "/home/news/detail", state: { id: item.id } }}>
  新闻1
</Link>5.6 编程式路由
借助
this.props.history对象上的 API 对路由进行跳转、前进、后退操作
jsx
this.props.history.push(); // 跳转
this.props.history.replace(); // 替换
this.props.history.goBack(); // 后退
this.props.history.goForward(); // 前进
this.props.history.go(); // 前进||后退5.7 withRouter
一般组件的
props中没有路由组件所持有的 history API
- 需要使用
withRouter - withRouter 可以加工一般组件,让一般组件可以具备路由组件所特有的 API
- withRouter 返回的是一个新组件
- 示例:
jsx
import React, { Component } from "react";
import { withRouter } from "react-router-dom";

class Header extends Component {
  forward = () => {
    this.props.history.goForward();
  };
  back = () => {
    this.props.history.goBack();
  };
  go = () => {
    this.props.history.go(-1);
  };
  render() {
    console.log("一般组件收到的props", this.props);
    return (
      <div className="page-header">
        <h2>React Router Demo</h2>
        <button onClick={this.forward}>前进</button>
        <button onClick={this.back}>后退</button>
        <button onClick={this.go}>go</button>
      </div>
    );
  }
}

export default withRouter(Header);5.8 BrowserRouter 与 HashRouter 的区别
- 底层原理不一样:
- BrowserRouter 使用的是 H5 的 history API,不兼容 IE9 及以下版本。
- HashRouter 使用的是 URL 的哈希值。
- path 表现形式不一样
- BrowserRouter 的路径中没有#,例如:localhost:3000/demo/test
- HashRouter 的路径包含#,例如:localhost:3000/#/demo/test
- 刷新后对路由 state 参数的影响
- BrowserRouter 没有任何影响,因为 state 保存在 history 对象中。
- HashRouter 刷新后会导致路由 state 参数的丢失!!!
- 备注:HashRouter 可以用于解决一些路径错误相关的问题。
06. 开源 React UI 组件库
6.1 material-ui(国外)
6.2 ant-design(国内蚂蚁金服)
sh
yarn add antd
# or
npm install antd --save- 使用
jsx
import React from "react";
import { DatePicker } from "antd";

const App = () => {
  return <DatePicker />;
};

export default App;- 配置默认主题
jsx
import React from "react";
import ReactDOM from "react-dom/client";
import { ConfigProvider } from "antd";
import App from "./App";

const root = ReactDOM.createRoot(document.getElementById("root"));

root.render(
  <ConfigProvider
    theme={{
      token: {
        colorPrimary: "#00b96b",
      },
      components: {
        Button: {
          colorPrimary: "#0ff",
        },
      },
    }}
  >
    <App />
  </ConfigProvider>
);