从零快速编写油猴脚本
通过文本可以学到什么
- 油猴脚本的作用
- 油猴脚本的安装与使用
- 油猴脚本由浅入深的编写
- 初学乍练 -- 实现基础功能:「百度两下」、「百度三下」、「百度四下」
- 初窥门径 -- 学习油猴入门 API
- 略有小成 -- 实现修改元素样式及事件 「免登录复制 CSDN 代码块」
- 驾轻就熟 -- 实现新增按钮并绑定事件 「B 站一键三连」
- 出神入化 -- 实现在任意页面可以快速访问 ChatGPT 「GPT anywhere」
- 登峰造极 -- 实现油猴脚本工程化(本地开发、版本控制、自动构建、自动发布并更新)
- 一代宗师 -- 未完待续...
- 超凡入圣 -- 未完待续...
- 入道境 -- 未完待续...
什么是油猴脚本
油猴脚本(Tampermonkey),又称 Greasemonkey 油猴脚本,是一款免费的浏览器扩展,可用于管理用户脚本,它本质上是对浏览器接口的二次封装。
特点:
- 内置的编辑器,可以非常方便地管理、编辑用户脚本
- 支持自动更新检查功能
- 标签中脚本运行状态速览
- 可以通过压缩文件、云存储进行脚本备份及还原
油猴脚本能做什么
油猴脚本可用于更改页面布局样式、完成页面自动化、去广告、下载影视等功能,适用于主流的浏览器。
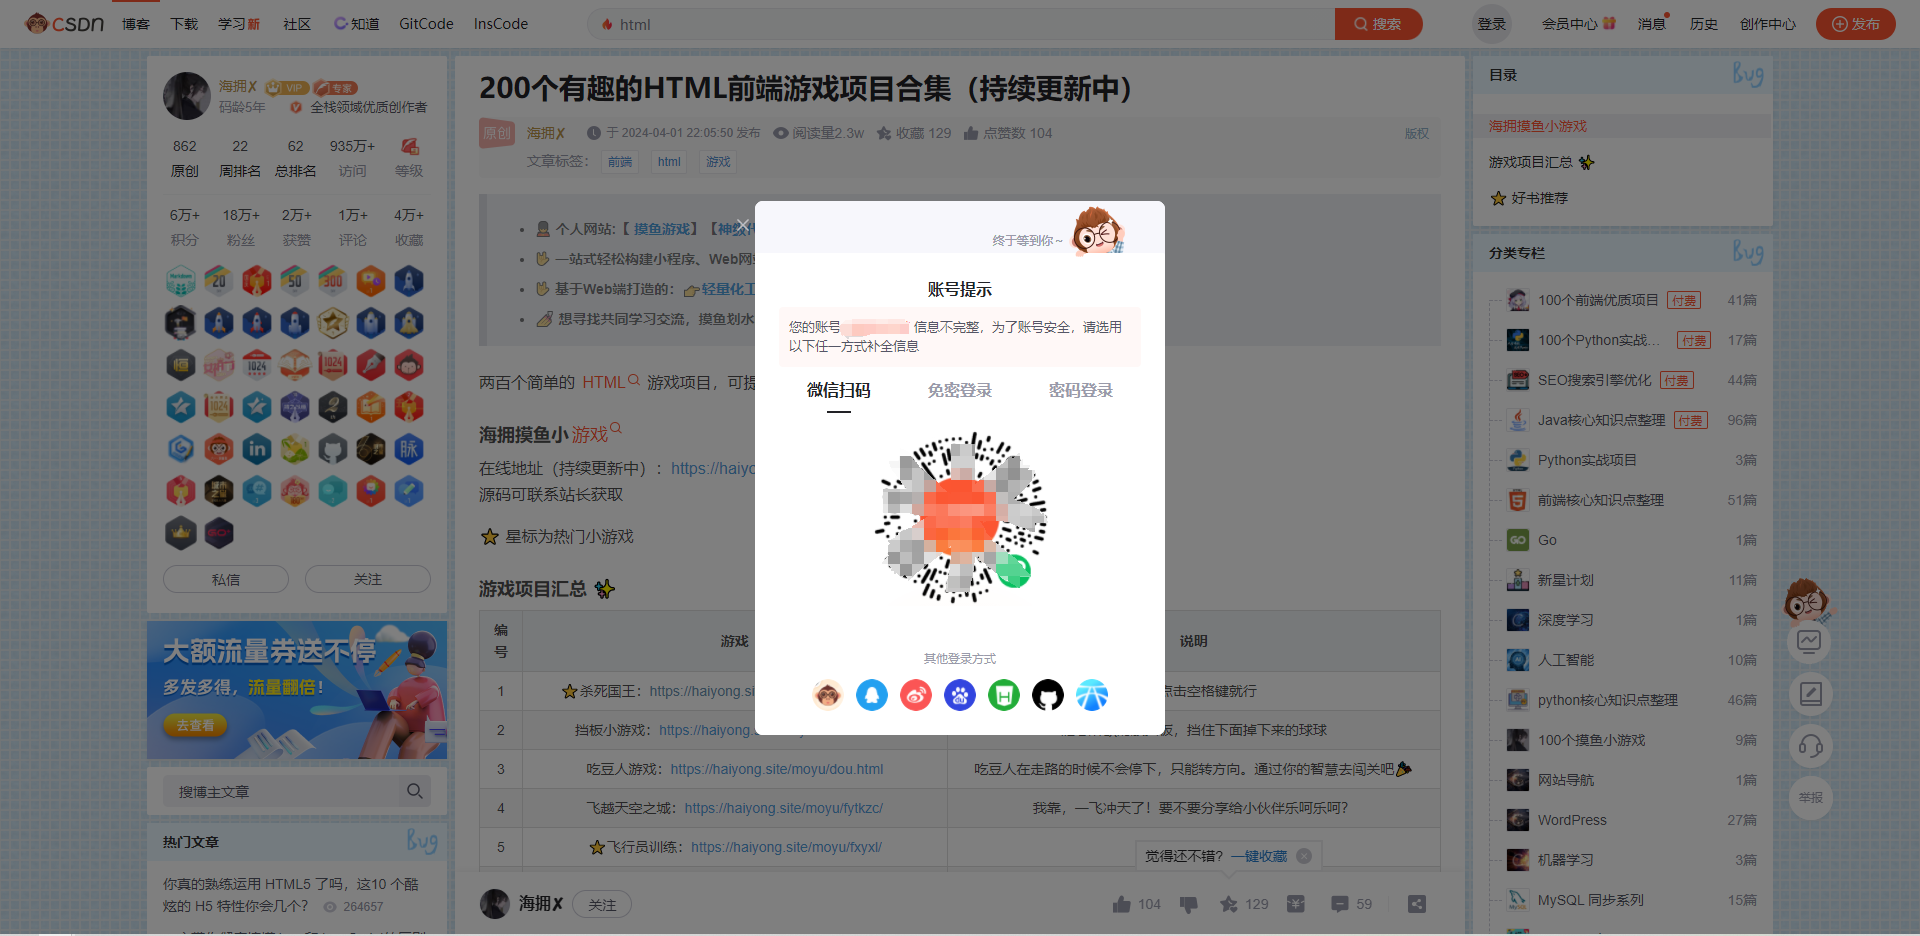
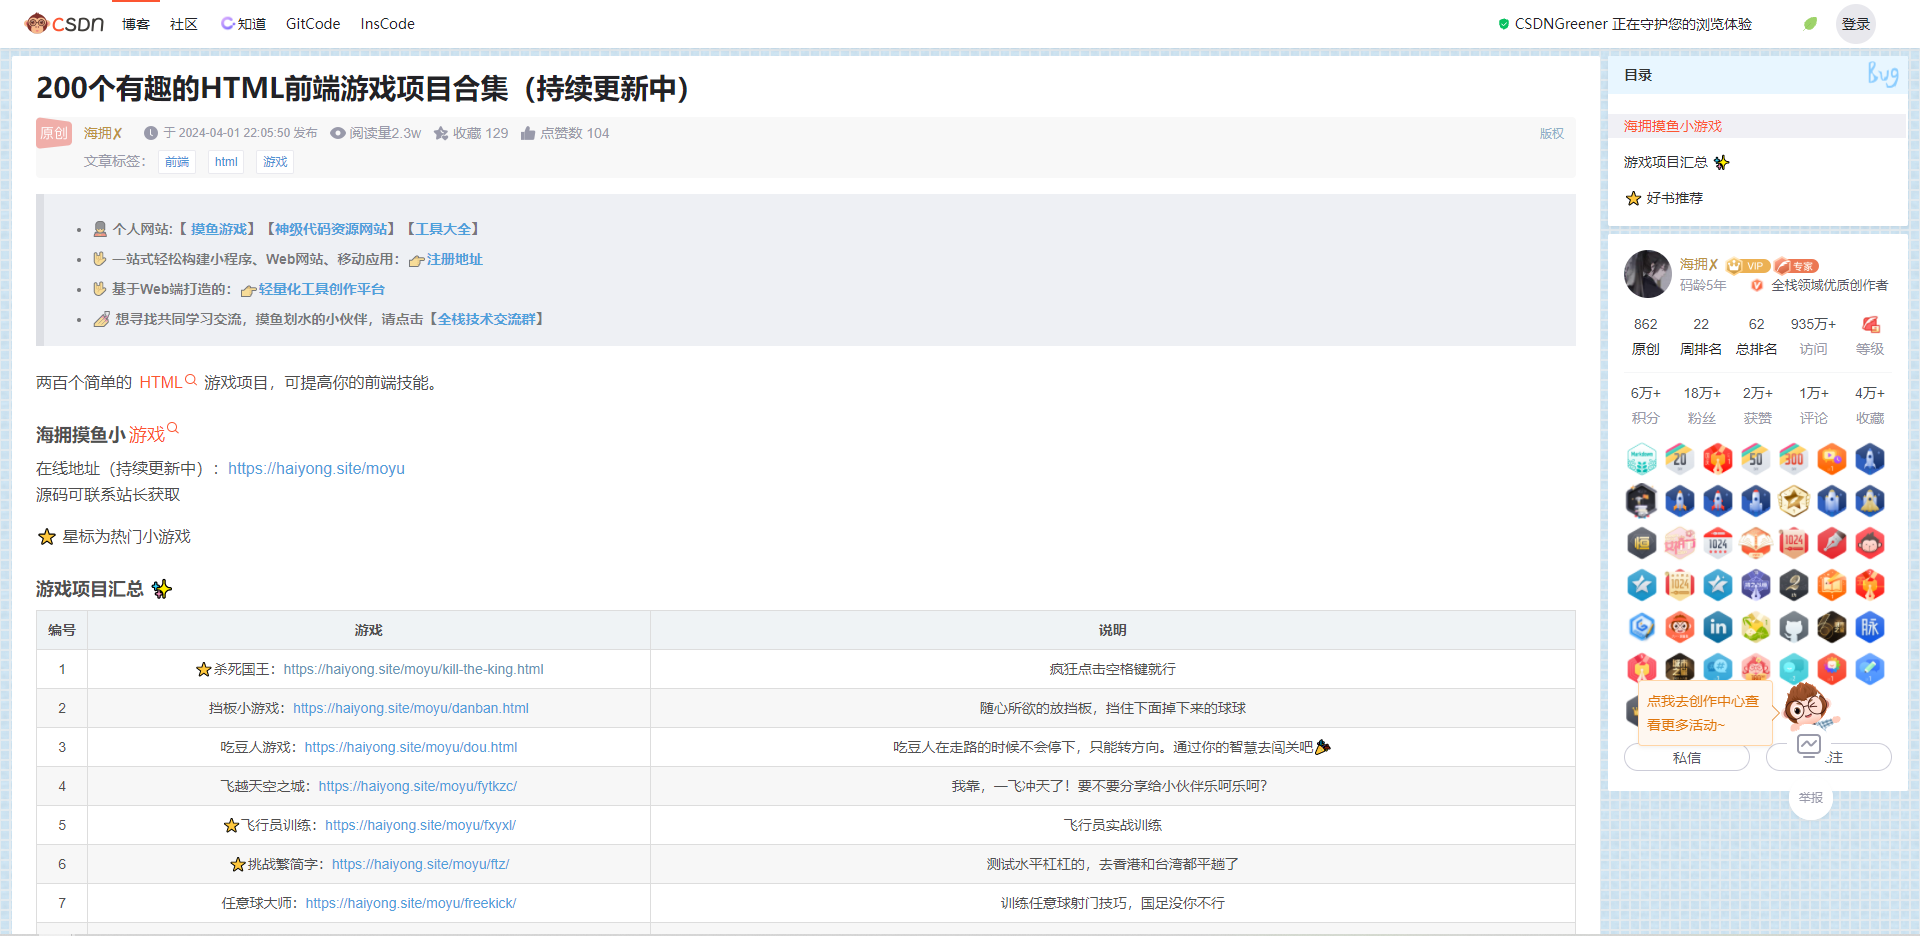
举个栗子,当我们查询技术资料时,常常会点进CSDN,飘屏的广告和未登录无法复制等限制简直太污染眼睛!通过加载油猴脚本,就可以实现去除不必要的广告和限制,只保留想要的页面内容。如下图【左为未加载油猴脚本,右为加载后】:
安装浏览器插件
想使用在线脚本或者编写脚本当然要先安装支持用户脚本的浏览器插件,即承载脚本的容器。
油猴支持的浏览器有 Chrome,Microsoft Edge,Safari,Opera Next,Firefox 和 UC 浏览器等等,各大主流浏览器几乎都支持了。
下载后,将 crx 文件安装到想要使用油猴脚本的浏览器中即可(PS:移动端的油猴脚本可参考官网)。
获取新脚本
跟学习一门语言或者框架一样,可以先看下前人是如何编写脚本的。
拿前面说到的 CSDN 脚本举例,我们可以执行以下步骤:
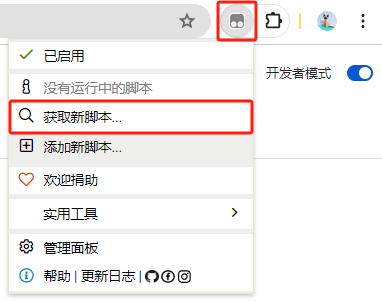
- 直接访问Greasy Fork(油叉检索脚本),或者从浏览器插件处点击“获取新脚本”,如下图:
- 搜索
CSDNGreener,总安装量最高的那个就是! - 点击标题,进入详情,可以上划查看脚本介绍。
- 点击“安装此脚本”,会进入到安装界面,下面就是该脚本的源代码(PS:其实就是 js 脚本)。
- 点击“安装”,安装成功后,再打开CSDN,是不是清爽了很多!
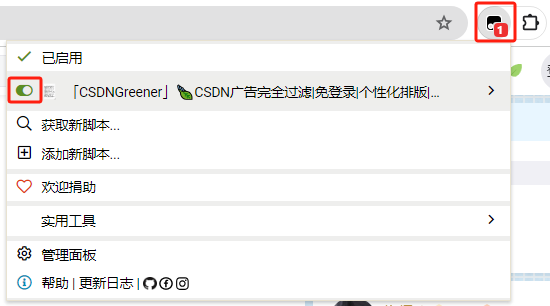
- 可以点击脚本前的“开关”组件,来启用和禁用脚本,操作后需刷新页面。
- 登录Greasy Fork后,你就可以收藏脚本或发布自己编写的脚本了。
编写新脚本
初学乍练
注意
想要编写油猴脚本,必须会用前端基础三件套:Html、Css、JavaScript。本人与百度、谷歌等搜索引擎公司已达成深度合作,相关学习资料可在上述网站查阅。
在上一步获取新脚本并安装的步骤中,应该有看到CSDNGreener的 js 脚本,共有 1700+行的代码,千万不要慌,庖丁解牛,先举一个小例子。
点击“添加新脚本”,如下图:
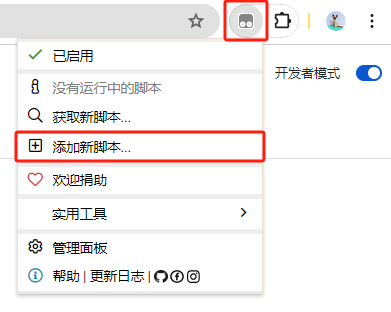
跳转至“新建用户脚本”页面,如下图:
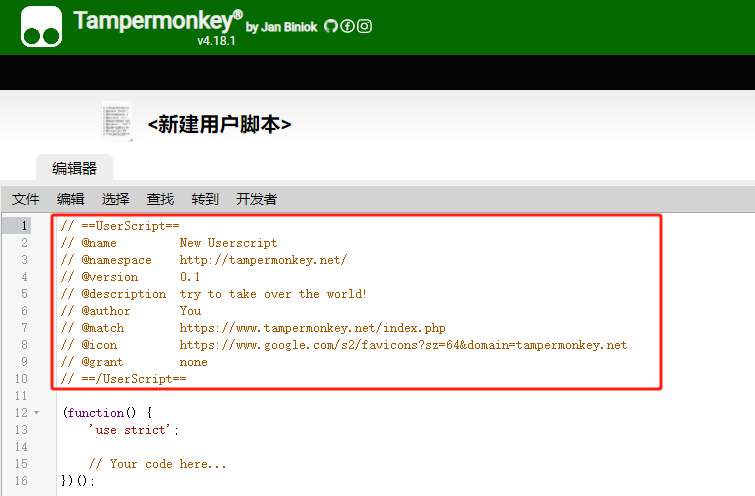
红框所包围的代码头,为脚本的元数据,包括脚本名称、作者、描述等信息。上图包含的仅为初始化时的最基础元数据配置,更多高级功能看后续介绍:
// ==UserScript== // @name 油猴脚本的名称 // @namespace 脚本的命名空间,用于确定脚本的唯一性,一般都是写作者的个人网址 // @version 0.1 这个是版本号,每次发布新版本都需要修改 // @description 这个是功能描述,描述你的这个脚本是用来干嘛的 // @author 这个是作者的名字,比如我:Ele-Cat // @require 定义脚本运行之前需要引入的外部 JS,比如:jQuery // @match 这个是该脚本匹配的网址,支持通配符匹配 // @include 这个也是该脚本匹配的网址,支持通配符匹配 // @exclude 这个和 iclude 配合使用,排除匹配到的网址,优先于 include // @icon 用于指定脚本的图标,可以设置为图片 URL 地址或 base64 的字符串 // @grant none 指定脚本运行所属的权限 // @connect 用于跨域访问时指定的目标网站域名 // @run-at 指定脚本的运行时机 document-start【脚本将尽快被注入】、document-body【如果body元素存在,脚本将被注入】、document-end【在DOMContentLoaded事件被触发时或之后,脚本将被注入】、document-idle【在DOMContentLoaded事件被触发后,脚本将被注入。如果没有给出@run-at标签,这是默认值】、context-menu【如果在浏览器的上下文菜单中点击脚本,将会被注入】 // ==/UserScript== (function() { 'use strict'; // 这里编写你的脚本 })();利用已有前端知识,实现“百度两下”功能
js// ==UserScript== // @name 「Ele-Cat」百度两下 // @namespace https://ele-cat.github.io/ // @version 0.0.1 // @description 基础-百度两下 // @author Ele-Cat // @match https://www.baidu.com/ // @grant none // ==/UserScript== (function () { "use strict"; let btn = document.getElementsByClassName("bg s_btn")[0]; btn.value = "百度两下"; })();编写并保存,再打开百度,“百度一下”就显示为“百度两下”,如下图:

再新建一个脚本,实现“百度三下”:
js// ==UserScript== // @name 「Ele-Cat」百度三下 // @namespace https://ele-cat.github.io/ // @version 0.0.1 // @description 基础-百度三下 // @author Ele-Cat // @match https://www.baidu.com/ // @grant none // ==/UserScript== (function () { "use strict"; console.log("我的脚本加载了"); let button = document.createElement("button"); //创建一个按钮对象 // 修改按钮的一系列属性 button.id = "id001"; button.textContent = "百度三下"; button.style.width = "108px"; button.style.height = "44px"; button.style.align = "center"; button.style.background = "#4e6ef2"; button.style.color = "#fff"; button.style.lineHeight = "45px"; button.style.padding = "0"; button.style.borderRadius = "0 10px 10px 0"; button.style.fontSize = "17px"; button.style.boxShadow = "none"; button.style.fontWeight = 400; button.style.border = "none"; button.style.outline = 0; //绑定按键点击功能 button.onclick = function () { console.log("点击了按键"); //为所欲为 功能实现处 if (document.getElementById("kw").value) { window.open( `https://www.baidu.com/s?wd=${document.getElementById("kw").value}`, "_self" ); } return; }; //绑定鼠标移入事件 button.onmouseenter = function () { console.log("鼠标移入按钮"); button.style.background = "#4662d9"; return; }; //绑定鼠标移出事件 button.onmouseleave = function () { console.log("鼠标移出按钮"); button.style.background = "#4e6ef2"; return; }; let btnBox = document.getElementsByClassName("bg s_btn_wr")[0]; //getElementsByClassName 返回的是数组,所以要用[] 下标 //在浏览器控制台可以查看所有函数,ctrl+shift+I 或 F12 调出控制台,在Console窗口进行实验测试 btnBox.appendChild(button); })(); //(function(){})() 表示该函数立即执行保存后,进入百度并刷新,就可以在“百度两下”的下方显示“百度三下”的按钮,如下图:

可以看到,同一个网页,可以同时运行 n 个不同的脚本,点击浏览器油猴插件图标,可以控制不同脚本的启用与禁用。
发布脚本
上步中保存的脚本仅在当前浏览器中可用,想在不同浏览器、电脑或想让更多人使用的话,就需要将脚本发布到用户脚本网站上。
注册账号并登录
- 访问Greasy Fork,点击右上角的登录,可以选择使用第三方账户【GitLab、GitHub 等】或注册账号密码后登录。
进入控制台
- 点击右上角的个人用户名进入“控制台”,点击进入第一项“发布你编写的脚本”;
- 如果是第一次进入,需点击“我编写了一个脚本并想分享给其他人”。
发布你编写的脚本
使用自己编写的脚本
- 换个浏览器检索用户脚本并安装这两个脚本,就可以在不同浏览器中或者让其他用户使用这两个脚本了。
脚本管理
- 可以在脚本“管理面板”中管理已安装的脚本。
更新脚本
- 更新脚本时切记提升版本号
varsion。
- 更新脚本时切记提升版本号
初窥门径
上小节我们实现了修改百度搜索按钮文字和添加新按钮的基础功能,接下来我们来实现一些进阶功能。
油猴提供了很多强大的 API,用于操作缓存及窗口等,如果不需要使用这些 API,可以声明 @grant 权限为 none,即:
// @grant none以下示例都可以在本地进行测试,保存后打开百度预览:
打印日志
js// ==UserScript== // @name 「Ele-Cat」百度测试 // @namespace https://ele-cat.github.io/ // @version 0.0.1 // @description 进阶-百度测试 // @author Ele-Cat // @match https://www.baidu.com/ // @grant GM_log // ==/UserScript== // 在控制台打印日志 GM_log("Hello World");此时会在控制台成功打印
injected: Hello World,类似于console.log()打印日志到控制台,只不过多了injected:标识。缓存管理
包含对缓存的新增、获取、删除,在使用之前我们都需要使用关键字
@grant进行授权:js// ==UserScript== // @name 「Ele-Cat」百度测试 // @namespace https://ele-cat.github.io/ // @version 0.0.1 // @description 进阶-百度测试 // @author Ele-Cat // @match https://www.baidu.com/ // @grant GM_setValue // @grant GM_getValue // @grant GM_deleteValue // ==/UserScript== // 设置缓存语法 // GM_setValue("example", true); // 获取缓存,并设定默认值 // GM_getValue("example", true); // 删除缓存 // GM_deleteValue("example"); // 初始化承载缓存的变量 let testStorage = ""; console.log("打印:", testStorage); // 打印:"" // 获取缓存,不设定默认值 testStorage = GM_getValue("testStorage"); console.log("打印:", testStorage); // 打印:undefined // 获取缓存,并设定默认值 testStorage = GM_getValue("testStorage", 9527); console.log("打印:", testStorage); // 打印:9527 // 设定缓存 GM_setValue("testStorage", 114514); // 获取缓存 testStorage = GM_getValue("testStorage"); console.log("打印:", testStorage); // 打印:114514 // 删除缓存 GM_deleteValue("testStorage"); // 获取缓存 testStorage = GM_getValue("testStorage"); console.log("打印:", testStorage); // 打印:undefined脚本中缓存的
新增 (GM_setValue)、获取 (GM_getValue)、删除 (GM_deleteValue),其实对应着浏览器本地存储中 localStorage 的setItem、getItem和removeItem方法,但是,脚本的缓存存储在扩展程序中,这时候命名空间namespace就起作用了!缓存监听
有时候,我们需要对缓存中的某个键的值进行监听,当发生变化时,调用一个方法事件:
js// ==UserScript== // @name 「Ele-Cat」百度测试 // @namespace https://ele-cat.github.io/ // @version 0.0.1 // @description 进阶-百度测试 // @author Ele-Cat // @match https://www.baidu.com/ // @grant GM_setValue // @grant GM_getValue // @grant GM_deleteValue // @grant GM_addValueChangeListener // @grant GM_removeValueChangeListener // ==/UserScript== (function () { "use strict"; // 初始化承载缓存的变量 let testStorage = ""; // 先清一下缓存,方便测试 GM_deleteValue("testStorage"); // 添加一个监听器 const listener_id = GM_addValueChangeListener( "testStorage", function (name, old_value, new_value, remote) { console.log("监听器", name, old_value, new_value, remote); } ); // 设定缓存时,监听器可以监听到缓存数据变化 GM_setValue("testStorage", 9527); // 获取缓存 testStorage = GM_getValue("testStorage"); console.log("打印:", testStorage); setTimeout(() => { // 3s后修改缓存,这个时候监听器已经被移除了,所以只能打印结果,但是不会触发监听 GM_setValue("testStorage", 114514); testStorage = GM_getValue("testStorage"); console.log("打印:", testStorage); }, 3000); // 移除监听器 GM_removeValueChangeListener(listener_id); // 打印结果: // 监听器 testStorage undefined 9527 false // 9527 // 114514 })();打开一个标签
GM_openInTab(url, options)可用于打开一个新的标签页面,这个函数接受两个参数,第一个参数用于指定新标签页面的 URL 地址,第二个参数用于指定页面展示方式及焦点停留页面js// ==UserScript== // @name 「Ele-Cat」百度测试 // @namespace https://ele-cat.github.io/ // @version 0.0.1 // @description 进阶-百度测试 // @author Ele-Cat // @match https://www.baidu.com/ // @grant GM_openInTab // ==/UserScript== (function () { "use strict"; // 语法: // GM_openInTab(url, { // active: true, // 新标签页获取页面焦点 // setParent: true, // 新标签页面关闭后,焦点重新回到源页面 // }) setTimeout(() => { // 3s后打开百度并聚焦在新页面 GM_openInTab("https://www.baidu.com", { active: true, setParent: true }); }, 3000); })();跨域请求
在授予
GM_xmlhttpRequest权限之后,就可以跨域发送请求了(PS:如果没有在元数据配置@connect,第一次跨域请求时,会弹出请求对话框,需要选中总是允许,才能正常进行跨域请求)。下面的例子实现了每 10s 从第三方服务器获取一张图片并将其设置为百度页面背景图:
js// ==UserScript== // @name 「Ele-Cat」百度测试 // @namespace https://ele-cat.github.io/ // @version 0.0.1 // @description 进阶-百度测试 // @author Ele-Cat // @match https://www.baidu.com/ // @grant GM_xmlhttpRequest // @connect api.lolimi.cn // ==/UserScript== (function () { "use strict"; getBg(); setInterval(() => { getBg(); }, 10 * 1000) function getBg() { let pageNum = Math.ceil(Math.random() * 1000) GM_xmlhttpRequest({ url: `https://api.lolimi.cn/API/loveanimer?screen=1&format=1&page=${pageNum}&limit=1`, method: "GET", headers: { "content-type": "application/json", }, data: "", onerror: function (err) { console.log(err); }, onload: function (res) { let img = JSON.parse(res.response)["code"] == 1 ? JSON.parse(res.response)["data"][0]["url"] : getBg(); let bgBox = document.getElementsByClassName("s-skin-container s-isindex-wrap skin-gray-event")[0]; setTimeout(() => { bgBox.style.backgroundImage = `url(${img})`; bgBox.style.backgroundRepeatX = "repeat"; bgBox.style.backgroundSize = "contain"; }, 1500); }, }); } })();添加元素、样式
之前的例子中,我们是通过创建元素、给元素绑定属性、将元素添加到对应的 DOM 来实现元素的添加功能,可以回顾【百度三下】功能。但是这种方法繁琐不利于维护和扩展。
- GM_addElement 方法
GM_addElement可以方便快捷地添加元素和样式,它创建一个由tag_name指定的 HTML 元素,并应用所有给定的attributes,然后返回注入的 HTML 元素。如果给定了parent_node,则将其附加到该节点上,否则将附加到文档的头部或主体中。请参考适当的文档了解适合的
attributes。例如:js// GM_addElement语法 GM_addElement("script", { textContent: 'window.foo = "bar";', }); GM_addElement("script", { src: "https://example.com/script.js", type: "text/javascript", }); GM_addElement(document.getElementsByTagName("div")[0], "img", { src: "https://example.com/image.png", }); GM_addElement(shadowDOM, "style", { textContent: "div { color: black; };", });实现替换百度首页背景功能:
js// ==UserScript== // @name 「Ele-Cat」百度测试 // @namespace https://ele-cat.github.io/ // @version 0.0.1 // @description 进阶-百度测试 // @author Ele-Cat // @match https://www.baidu.com/ // @grant GM_addElement // ==/UserScript== (function () { "use strict"; GM_addElement(document.getElementsByClassName("wrapper_new")[0], "div", { id: "test-add-element", style: `position: fixed;top: 0;left: 0;width: 100vw;height: 100vh;background-image: url(https://api.lolimi.cn/API/tup/xjj.php);background-repeat-x: repeat;background-size: contain;`, }); })();- GM_addStyle 方法
GM_addStyle可以将新写的 css 代码插入到head标签中,实现快速样式修改js// GM_addStyle语法 GM_addStyle(".dom {attr: value}");快速修改百度首页背景:
js// ==UserScript== // @name 「Ele-Cat」百度测试 // @namespace https://ele-cat.github.io/ // @version 0.0.1 // @description 进阶-百度测试 // @author Ele-Cat // @match https://www.baidu.com/ // @grant GM_addStyle // ==/UserScript== (function () { "use strict"; GM_addStyle( ".s-skin-container.s-isindex-wrap.skin-gray-event {background-image: url(https://api.lolimi.cn/API/tup/xjj.php) !important;background-repeat-x: repeat;background-size: contain;}" ); })();- 引入 JQuery
GM_addElement和GM_addStyle其原理也是调用原生 js 来实现函数方法,既然如此,我们直接引入 JQuery 来实现添加元素及样式。JQuery 教程请参考这里。与
GM_addElement、GM_addStyle不同的是,引入 Jquery 并不是@grant相关的权限,而是用到@require,下面的例子轻松实现了百度按钮的文字、颜色替换:js// ==UserScript== // @name 「Ele-Cat」百度测试 // @namespace https://ele-cat.github.io/ // @version 0.0.1 // @description 进阶-百度测试 // @author Ele-Cat // @match https://www.baidu.com/ // @require https://code.jquery.com/jquery-3.6.0.min.js // ==/UserScript== (function () { "use strict"; $(document).ready(function () { $(".bg.s_btn").val("百度四下").css({ color: "red" }); }); })();
小节
油猴的 API 有很多,可以查阅油猴脚本官方文档或查阅Tampermonkey 油猴脚本中文文档,来使用更多更高级的脚本功能。
略有小成
上小节给出了一些常用的 Greasemonkey API。我们可以利用这些 API 来完成一个小功能。
先实现一个简单的 「免登录复制 CSDN 代码块」 功能。

代码展示
// ==UserScript==
// @name         「Ele-Cat」免登录复制CSDN代码块
// @namespace    https://ele-cat.github.io/
// @version      0.0.1
// @description  略有小成-免登录复制CSDN代码块
// @author       Ele-Cat
// @match        *://*.csdn.net/*
// @grant        GM_addStyle
// @require      https://code.jquery.com/jquery-3.6.0.min.js
// ==/UserScript==

(function () {
  "use strict";

  GM_addStyle(
    "main div.blog-content-box pre .hljs-button.active {width: auto !important;}"
  );

  // 免登录复制
  $(".hljs-button").removeClass("signin");
  $(".hljs-button").attr("data-title", "免登录复制");
  $(".hljs-button").css({
    width: "auto !important",
    padding: "4px 8px",
    margin: "2px 12px 2px 0",
  });
  $("#content_views").unbind("copy");
  // 去除剪贴板劫持
  $("code").attr(
    "onclick",
    "mdcp.copyCode(event);setTimeout(function(){$('.hljs-button').attr('data-title', '免登录复制');},3000);"
  );
  try {
    // 移除CSDN copyright信息(保留格式)
    Object.defineProperty(window, "articleType", {
      value: 0,
      writable: false,
      configurable: false,
    });
  } catch (err) {}
  csdn.copyright.init("", "", "");
})();代码解析
- 元数据中
@match匹配*://*.csdn.net/*,意思是匹配所有以 https:// 或 http:// 开头,域名为 csdn.net,路径为任意值的 URL; - 元数据使用
@grant的GM_addStyle,@require使用JQuery; - 通过
GM_addStyle方法,给按钮添加一些基础样式; - 通过 JQuery 对“登录复制”按钮的文案和样式进行修改;
- 对复制按钮的
onclick事件进行修改,去除剪贴板劫持; - 移除 CSDN copyright 信息,的、并保留代码格式。
驾轻就熟
网页版 B 站的视频播放界面,需要长按点赞才可以三连,我们直接在点赞按钮前,加一个真正的「一键三连」功能。
点击直接安装
效果预览:

代码展示
// ==UserScript==
// @name         「Ele-Cat」Bilibili一键三连
// @namespace    https://ele-cat.github.io/
// @version      0.0.1
// @description  进阶-Bilibili一键三连
// @author       Ele-Cat
// @match        *://*.bilibili.com/*
// @grant        GM_addStyle
// @require      https://code.jquery.com/jquery-3.6.0.min.js
// ==/UserScript==

(async () => {
  "use strict";

  GM_addStyle(
    ".ad-report.video-card-ad-small {display: none !important;}.video-toolbar-left-item:hover .video-sanlian-icon path {fill: #00AEEC;transition: all .3s;}"
  );

  const getElementObject = function (
    selector,
    allowEmpty = true,
    delay = 10,
    maxDelay = 20000
  ) {
    return new Promise((resolve, reject) => {
      let totalDelay = 0;
      let element = document.querySelector(selector);
      let result = allowEmpty ? !!element : !!element && !!element.innerHTML;
      if (result) {
        resolve(element);
      }
      let elementInterval = setInterval(() => {
        if (totalDelay >= maxDelay) {
          //总共检查20s,如果还是没找到,则返回
          clearInterval(elementInterval);
          resolve(null);
        }
        element = document.querySelector(selector);
        result = allowEmpty ? !!element : !!element && !!element.innerHTML;
        if (result) {
          clearInterval(elementInterval);
          resolve(element);
        } else {
          totalDelay += delay;
        }
      }, delay);
    });
  };

  let videoContainer = await getElementObject(".total-reply");
  if (!videoContainer) {
    return false;
  }
  let yijiansanlian = `<div class="toolbar-left-item-wrap" id="yijiansanlian" style="margin-right:18px">
        <div title="一键三连(A)" class="video-sanlian video-toolbar-left-item">
          <svg t="1713697381796" class="video-sanlian-icon video-toolbar-item-icon" viewBox="0 0 1024 1024" version="1.1" xmlns="http://www.w3.org/2000/svg" p-id="5138" width="36" height="36"><path d="M509.5 75c169.833 0 317.619 94.397 393.751 233.585 40.88 71.778 61.698 155.459 55.55 243.368a29.85 29.85 0 0 1-2.416 9.88 447.03 447.03 0 0 1-14.076 79.69l-115.09-42.056c5.807-24.376 8.881-49.813 8.881-75.967 0-180.376-146.224-326.6-326.6-326.6-180.376 0-326.6 146.224-326.6 326.6 0 180.376 146.224 326.6 326.6 326.6 30.589 0 60.195-4.205 88.273-12.069l40.427 115.23C597.434 965.45 554.232 972 509.5 972c-196.366 0-363.257-126.196-423.997-301.91-21.11-56.21-30.746-117.523-26.305-181.043 7.646-109.337 55.686-206.39 128.921-278.384C269.594 126.977 383.477 75 509.5 75z m53.012 463.588l341.183 120.66c11.452 4.233 17.172 16.224 12.88 26.807-1.95 5.236-5.939 9.49-11.078 11.833l-129.831 57.316c-9.989 4.208-17.934 12.044-22.175 21.87l-55.08 129.121c-4.244 10.478-16.909 15.428-27.572 11.418l-0.323-0.124c-5.72-2.117-10.013-7.06-12.156-12.7L535.328 565.394a20.368 20.368 0 0 1 0.688-16.068c2.424-5.046 6.82-8.918 12.19-10.74 4.287-2.116 9.297-2.116 14.306 0zM509 300.1c118.615 0 215.395 93.49 220.673 210.802 0.218 4.005 0.327 8.039 0.327 12.098 0 12.958-1.115 25.655-3.255 38l-28.716-10.164a29.739 29.739 0 0 1-15.271-5.405l-154.65-54.743c-6.997-2.96-13.994-2.96-19.982 0-7.503 2.547-13.642 7.96-17.029 15.016a28.5 28.5 0 0 0-1.134 21.998l0.173 0.467 75.514 208.503C547.57 741.453 528.583 744 509 744c-122.055 0-221-98.945-221-221 0-4.06 0.11-8.093 0.326-12.098C293.605 393.589 390.385 300.1 509 300.1z" fill="#61666D" p-id="5139"></path></svg>
          <span class="video-sanlian-info video-toolbar-item-text">一键三连</span>
        </div>
      </div>`;
  if ($("#yijiansanlian").length === 0) {
    $(".video-toolbar-left-main").prepend(yijiansanlian);
  }

  $("body").on("click", "#yijiansanlian", function () {
    $("#arc_toolbar_report .video-like").click(); // 点赞
    $("#arc_toolbar_report .video-coin").click(); // 投币
    // $("#arc_toolbar_report .video-fav").click(); // 收藏
  });

  $(document).keydown(function (event) {
    // 检查按下的键是否是 'A' 键的键码,键码为65
    if (event.which === 65) {
      // 在这里执行您想要的操作
      $("#yijiansanlian").click();
    }
  });
})();代码解析
- 元数据中
@match匹配*://*.bilibili.com/*,意思是匹配所有以 https:// 或 http:// 开头,域名为 bilibili.com,路径为任意值的 URL; - 元数据使用
@grant的GM_addStyle,@require使用JQuery; - 通过
GM_addStyle方法,添加一些基础样式; - 由于 B 站添加了 DOM 渲染校验机制,如果我们在校验前对 DOM 进行添加处理,会触发刷新页面或报错等,所以添加了
getElementObject方法,来延迟获取 DOM 是否加载成功; - 如果加载成功,则在
.video-toolbar-left-main中添加“一键三连”的按钮并赋给它点击事件,同时,监听键盘点击事件,点击“A”时也可以触发“一键三连”。
出神入化
上两小节中,都是对按钮样式、事件的处理,这节我们进阶实现一个在任意网页都可以快速访问 ChatGPT 的功能: 「GPT anywhere」。
点击直接安装
效果预览:
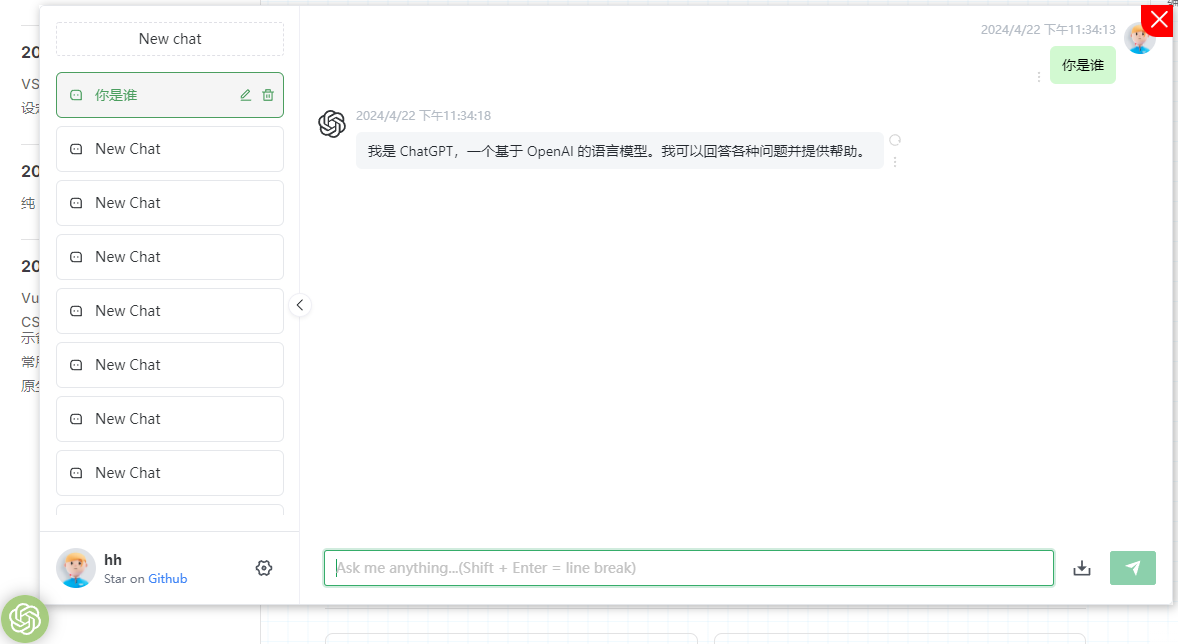
代码展示
// ==UserScript==
// @name         「Ele-Cat」ChatGPT anywhere
// @namespace    https://ele-cat.github.io/
// @version      0.0.1
// @description  出神入化-ChatGPT anywhere
// @author       Ele-Cat
// @match        *://*/*
// @grant        GM_addStyle
// @require      https://code.jquery.com/jquery-3.6.0.min.js
// ==/UserScript==

(function () {
  "use strict";

  GM_addStyle(
    `#popupButton:hover {
      background-color: rgba(152, 195, 106, 1) !important;
    }
    #closeButton:hover #close-icon{
      fill: #fff !important;
    }
    .flex.items-center.flex-col.justify-center.mt-4.text-center {
      display: none !important;
    }
    .n-config-provider>div {
      padding: 0 !important;
    }
    .flex-1.min-h-0.pb-4.overflow-hidden+.p-4 {
      display: none !important;
    }
    .flex.items-center.justify-between.space-x-2>div:nth-of-type(1), .flex.items-center.justify-between.space-x-2>div:nth-of-type(2), .flex.items-center.justify-between.space-x-2>div:nth-of-type(5) {
      display: none !important;
    }
    .home_sidebar__fPZfq{
      width: 240px;
    }
    .home_window-content__2WGYf{
      flex: 1;
    }`
  );

  $(document).ready(function () {
    // 创建按钮
    let $button = $('<div id="popupButton" title="点击打开ChatGPT"></div>');
    $button.css({
      position: "fixed",
      bottom: "12px",
      left: "12px",
      zIndex: "999999999",
      width: "48px",
      height: "48px",
      backgroundColor: "rgba(152, 195, 106, 0.85)",
      borderRadius: "50%",
      cursor: "pointer",
      display: "flex",
      alignItems: "center",
      justifyContent: "center",
      boxShadow: "0px 0px 16px rgba(0, 0, 0, 0.3)",
      transtion: "all .8s",
    });
    // 按钮图标
    let $gptIcon = $(
      '<svg id="gpt-icon" viewBox="0 0 1024 1024" version="1.1" xmlns="http://www.w3.org/2000/svg" p-id="1456" width="64" height="64"><path d="M956.408445 419.226665a250.670939 250.670939 0 0 0-22.425219-209.609236A263.163526 263.163526 0 0 0 652.490412 85.715535 259.784384 259.784384 0 0 0 457.728923 0.008192a261.422756 261.422756 0 0 0-249.44216 178.582564 258.453206 258.453206 0 0 0-172.848261 123.901894c-57.03583 96.868753-44.031251 219.132275 32.153053 302.279661a250.670939 250.670939 0 0 0 22.32282 209.609237 263.163526 263.163526 0 0 0 281.595213 123.901893A259.067596 259.067596 0 0 0 566.271077 1023.990784a260.60357 260.60357 0 0 0 249.339762-178.889759 258.453206 258.453206 0 0 0 172.848261-123.901893c57.445423-96.868753 44.13365-218.82508-32.050655-302.074865zM566.578272 957.124721c-45.362429 0-89.496079-15.666934-124.516283-44.543243 1.638372-0.921584 4.198329-2.150363 6.143895-3.481541l206.537289-117.757998a32.35785 32.35785 0 0 0 16.895713-29.081105V474.82892l87.243317 49.97035c1.023983 0.307195 1.638372 1.228779 1.638372 2.252762v238.075953c0 105.8798-86.936122 191.689541-193.942303 191.996736zM148.588578 781.102113a189.846373 189.846373 0 0 1-23.346803-128.612213c1.535974 1.023983 4.09593 2.559956 6.143895 3.48154L337.922959 773.729439c10.444622 6.143896 23.346803 6.143896 34.098621 0l252.30931-143.664758v99.531108c0 1.023983-0.307195 1.945567-1.331177 2.559956l-208.892449 118.986778a196.297463 196.297463 0 0 1-265.518686-70.04041zM94.112704 335.97688c22.630015-39.013737 58.367008-68.81163 101.16948-84.171369V494.591784c0 11.7758 6.45109 22.93721 16.793315 28.978707l252.30931 143.767156L377.141493 716.796006a3.174346 3.174346 0 0 1-2.867152 0.307195l-208.892448-118.986777A190.870355 190.870355 0 0 1 94.215102 335.874482z m717.607001 164.861198L559.410394 357.070922 646.653711 307.20297a3.174346 3.174346 0 0 1 2.969549-0.307195l208.892449 118.986777a190.358364 190.358364 0 0 1 70.961994 262.139544 194.556693 194.556693 0 0 1-101.16948 84.171369V529.407192a31.538664 31.538664 0 0 0-16.588518-28.671513z m87.03852-129.329002c-1.74077-1.023983-4.300727-2.559956-6.246294-3.48154l-206.639687-117.757999a34.09862 34.09862 0 0 0-33.996222 0L399.566711 393.934295v-99.531108c0-1.023983 0.307195-1.945567 1.331178-2.559956l208.892449-119.089176a195.990268 195.990268 0 0 1 265.518686 70.450003c22.732414 38.706542 31.129071 84.171369 23.346803 128.305018zM352.258716 548.862861l-87.243317-49.560757a2.457558 2.457558 0 0 1-1.638372-2.252762V258.870991c0-105.8798 87.243317-191.996736 194.556692-191.689541a194.556693 194.556693 0 0 1 124.209089 44.543243c-1.638372 0.921584-4.198329 2.252762-6.143896 3.48154l-206.639687 117.757999a31.948257 31.948257 0 0 0-16.793315 29.081105l-0.307194 286.715126z m47.307995-100.759887L512 384.001664l112.535687 63.998912v127.997824l-112.228492 63.998912-112.535687-63.998912-0.307195-127.997824z" p-id="1457"></path></svg>'
    );
    $gptIcon.css({
      width: "32px",
      fill: "#fff",
      pointerEvents: "none",
    });
    // 图标添加至按钮
    $button.append($gptIcon);
    if (window.self === window.top) {
      // 如果不是iframe页,将按钮添加至页面
      $("body").append($button);
    } else {
      // 是iframe页就不继续执行下面代码了
      return false;
    }
    // gpt地址
    let gptUrl = "https://chat18.aichatos.xyz";
    // 创建弹窗
    let $popup = $('<div id="popupContainer"></div>');
    $popup.css({
      display: "none",
      position: "fixed",
      left: "50px",
      bottom: "50px",
      zIndex: 9998,
      backgroundColor: "#fff",
      boxShadow: "2px 2px 10px rgba(0,0,0,0.3)",
    });
    // 创建iframe
    let $iframe = $(`<iframe src="${gptUrl}"></iframe>`);
    $iframe.css({
      width: "1200px",
      height: "600px",
      maxWidth: "80vw",
      maxHeight: "80vh",
      border: "none",
    });
    // 创建关闭按钮
    let $closeButton = $('<div id="closeButton" title="关闭"></div>');
    $closeButton.css({
      position: "absolute",
      top: 0,
      right: 0,
      width: "32px",
      height: "32px",
      backgroundColor: "red",
      display: "flex",
      alignItems: "center",
      justifyContent: "center",
      borderRadius: "0 0 0 16px",
      cursor: "pointer",
    });
    // 关闭图标
    let $closeIcon = $(
      '<svg id="close-icon" viewBox="0 0 1024 1024" version="1.1" xmlns="http://www.w3.org/2000/svg" p-id="4248" width="32" height="32"><path d="M0 0h1024v1024H0z" fill-opacity="0" p-id="4249"></path><path d="M240.448 168l2.346667 2.154667 289.92 289.941333 279.253333-279.253333a42.666667 42.666667 0 0 1 62.506667 58.026666l-2.133334 2.346667-279.296 279.210667 279.274667 279.253333a42.666667 42.666667 0 0 1-58.005333 62.528l-2.346667-2.176-279.253333-279.253333-289.92 289.962666a42.666667 42.666667 0 0 1-62.506667-58.005333l2.154667-2.346667 289.941333-289.962666-289.92-289.92a42.666667 42.666667 0 0 1 57.984-62.506667z" p-id="4250"></path></svg>'
    );
    $closeIcon.css({
      width: "24px",
      fill: "#fafafa",
      position: "relative",
      top: "-2px",
      right: "-2px",
      pointerEvents: "none",
    });
    $closeButton.append($closeIcon);
    $popup.append($iframe);
    $popup.append($closeButton);
    $("body").append($popup);

    // 点击按钮显示弹窗
    $button.click(function () {
      $popup.show();
      $("body").css({ overflow: "hidden" });
    });
    $(document).click(function (event) {
      if (
        !$(event.target).closest("#popupContainer").length &&
        !$(event.target).is("#popupButton")
      ) {
        $popup.hide();
        $("body").css({ overflow: "auto" });
      }
    });

    $closeButton.click(function () {
      $popup.hide();
      $("body").css({ overflow: "auto" });
    });
  });
})();代码解析
- 元数据中
@match匹配*://*/*,意思是匹配所有以 https:// 或 http:// 开头,域名、路径为任意值的 URL; - 元数据使用
@grant的GM_addStyle,@require使用JQuery; - 通过
GM_addStyle方法,添加一些基础样式; - 当 DOM 加载完成,创建按钮和弹窗并渲染在 Body 上;
- 点击按钮,触发弹窗的展示。
登峰造极
前几节的示例代码,全都是在网页的油猴编辑器里编写、测试、运行的,这在编写简单脚本时没什么问题,但在编写一些复杂脚本代码量很大时,没有代码提示、错误检查,html、css、js 混在一起写,代码不易维护且开发体验很差,所以,我们来实现一下油猴脚本工程化。
工程化是什么
在编程领域,工程化指的是将软件开发过程中的最佳实践、工具和流程应用于项目中,以提高代码质量、开发效率和团队协作的方法。工程化的目标是确保软件项目能够在各个方面都达到高水平的标准,包括可维护性、可扩展性、稳定性、安全性和性能。
工程化在软件开发中涉及到多个方面,包括但不限于:
版本控制: 使用版本控制系统(如 Git、SVN 等)来管理代码的版本历史,以便团队成员可以协作开发、追踪变更和回溯历史。
自动化构建: 使用构建工具(如 Maven、Gradle、Webpack 等)自动化构建过程,包括编译、打包、压缩、测试和部署等步骤,以提高开发效率并减少人为错误。
代码规范: 遵循一定的编码规范和风格指南,确保代码的可读性、一致性和易维护性。常见的规范包括使用恰当的命名规范、缩进风格、注释规范等。
自动化测试: 编写自动化测试用例,包括单元测试、集成测试和端到端测试等,以确保代码的功能正确性和稳定性,并在持续集成(CI)环境中自动运行测试。
持续集成和持续部署: 将持续集成(CI)和持续部署(CD)流程整合到开发过程中,通过自动化构建、测试和部署流程,实现快速迭代和交付高质量的软件。
依赖管理: 使用依赖管理工具(如 npm、pip、Maven 等)管理项目所依赖的第三方库和组件,确保版本管理和依赖关系的清晰和可控。
代码审查: 进行代码审查(Code Review),通过团队成员之间的代码审查来发现潜在的问题、改进代码质量,并促进知识分享和团队协作。
文档和注释: 编写清晰、详细的文档和注释,包括代码文档、API 文档、使用手册等,以便开发者和用户理解和使用项目。
综上所述,编程中的工程化旨在通过采用一系列的最佳实践和工具,提高软件项目的质量、效率和可维护性,从而更好地满足用户需求和项目目标。